|
|
|
Monechron User Manual
Individual Features and Functions
 I.
Pay & Record I.
Pay & Record
This first (default)
screen of Monechron is the place to write
checks or enter transactions that you've made offline 
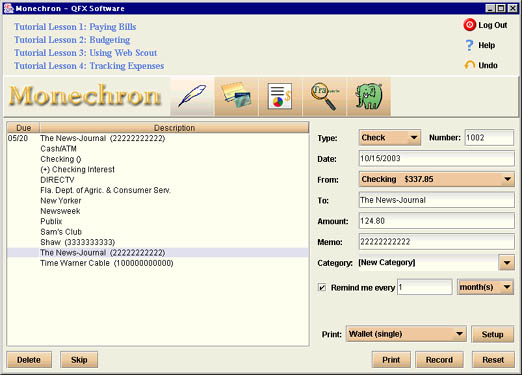
On
the left side of the screen is a list of transaction reminders and
previous payees. The reminders are at the top of the list with due
dates, and the rest of the payees are sorted alphabetically. When
you write a check to a recurring payee, you can take this short cut:
Select the payee on the list and all the previous information will
appear on the right. Edit the information as you wish.
- Delete
-
remove the selected
payee from the record
-
- Skip
-
skip the selected
reminder for this period
-
- Stop
-
Stop the reminder
On the right side is
the blank check and you do what you usually do writing a
check---fill in the necessary information.
- Type
-
type of transaction
(Click on the arrow for the dropdown list.)
-
- Number
-
your check number
(After first use, the numbers will appear in sequence
automatically.)
-
- Date
-
date of transaction
(The current date is the default. You can edit it by clicking on
the date.)
-
- From
-
where you draw
money from and current balance of the account (Click on the
arrow for the dropdown list of your accounts.)
-
- To
-
the payee (The
recurring payees will display in alphabetical order in the area
on the left; click to select. Later, when the list gets too
long, you can type in the first few letters of a particular
payee to bring it to the bottom of the screen.)
-
- Amount
-
amount of payment
-
- Memo
-
relevant
information that will appear in the lower left part of your
check (It could be your account number with the payee or
something else.)
-
- Category
-
categorization of
transaction (Click on the arrow and select from the list;
optional.)
-
- Remind me
-
If you make
payments to a payee regularly, click on the arrow to select from
the list the frequency of payment. The payee's name and due date
will appear in the top portion of the left area ten days in
advance. If you do not wish to be reminded of next payment,
click on the little square box before Remind me to skip.
-
- Preview
-
When the check is
ready for printing, you may click on Preview to view the check.
If it is satisfactory, click on Close to go back to the previous
screen. Then click on Print.
-
- Print:
-
Click on the
dropdown list to select the type of checks you prefer.
-
- Setup
-
Set up checks for
printing (see Tutorial Lesson
1 and User Manual 6.
Preferences for details).
-
- Print
-
Print out or record
a check.
-
- Reset
-
Discard a
transaction.
-
- Record
-
Record a
transaction (usually after you've entered an offline
transaction)
For step-by-step
instructions on how to write and print checks and how how to enter
other transactions, go to Tutorial Lesson
1.
 Previous Top
  Next
Next
|
