|
|
|
Monechron
Tutorials
Lesson
1: Writing and printing a check; recording other transactions
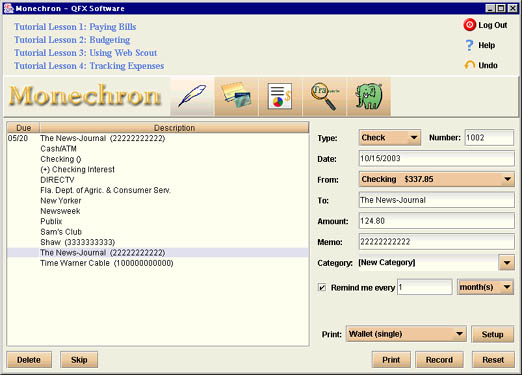
Have at hand a bill
you need to pay and a blank check from your checkbook (any
size check will do) and follow the steps below 
-
The default Type of
transaction is Check, which should be selected when you write
checks.
-
After Number, enter
your check number.
-
The Date is always
current so you don't need to do anything here.
-
The default account
is Checking, From which you write your check. If you've entered
more than one accounts and want to draw money from a savings
account, select from the dropdown list.
-
After To, enter the
name of the payee.
-
After Amount, enter
the amount you pay.
-
After Memo, enter
the account number that appears on the bill. This will appear on
the lower left corner of your check.
-
After Category,
select from the dropdown list relevant category for this
transaction (optional).
-
After Remind me,
select how often you want to be reminded of the subsequent
payments. The reminder will appear ten days before next due
date. (If not a recurring payment, uncheck the small box to
skip the step.)
After the check is
printed out, the information will be automatically saved in the
register. Later, when you write a check to the same payee again,
what we call a recurring payee, you need only
-
Select the payee
from the payee list on the left, and
-
Adjust the inputs
for the new payment and click on Print.
Should you change your
mind about writing the check before printing it out, simply click on
Reset to clear the inputs.
Because Monechron
uses all types and sizes of checks, and because different
sizes of checks (even when they are of the same type, say, regular
wallet checks) may vary somewhat in layout, you may have to adjust
the printing settings to fit your checks the first time you use Monechron.
Click on Setup in the
lower right corner and the screen should look like this

You can have your
signature automatically printed on every check. If you are
interested in this feature, follow the instructions below:
-
Write out your
signature on a piece of white paper and scan it into your
computer. (Kinko's can do this for you if you don't have a
scanner.)
-
Save the scanned-in
signature as a .gif or .jpeg file. The file should have a
transparent or white background and shouldn't be larger than
160-by-30 pixels.
-
Click Browse to
select your signature file and the signature will appear on the
checks you print out through Monechron.
(Banks will accept your printed signature as if manually
signed.)
If you do not wish to
have automatic signature on each of your checks, skip this section.
Now click on Setup
Checks. The screen should look like this

On the screen you see a
check set in the grid with five visible fields---Date, Payee, Amount
of payment, the Written out Amount, and Memo, filled in with
hypothetical outputs. Click on these outputs one by one, and their
respective positions will be marked on the grid in inches and
fractions from the top and the left edges of the check. The
measurements of each output is also displayed in the Selected Output
area on the right.
Signature, the sixth
field, is invisible here. Click on the lower right corner of the
check, and the field will show, with its measurements. (This field
will be visible if you've set up automatic signature printing---See 1.2.1
above).
These six fields are
common in all checks, though their positions on different types and
sizes of checks may differ. To make sure that the outputs from Monechron
will fit exactly in the fields on your checks, you may need to
adjust the positions of the outputs on the screen before printing
out your first check.
A simple way to adjust
the outputs on the screen for your check is use the grid the program
provides. But first you may want to see if your check is perfect for
Monechron (It may, as it happens from time
to time): Select the Type of checks (you're using) from the dropdown
list and print out a sample check (on a blank sheet of paper). Hold
it up to a light with your check behind it. If the outputs in the
sample align perfectly with the fields on your check, you can skip
the rest of this section and go straight to printing out your first
check on Monechron. Otherwise, follow the
steps below:
-
Click on Print Grid
to get a copy of the grid.
-
Hold the grid up to
a light with your check behind it and mark on the grid
the exact location of each underlined field on your check.
-
Note each field's
distance in inches and fractions from the top edge and left
edge on the grid.
-
Click on individual
outputs on the screen and drag each of them to the
desired positions on the grid. (You can also drag to lengthen
each item or drag the bottom line to enlarge/shrink the check.)
-
Click on Print
Sample again to make sure that the outputs on the sample check
are properly aligned with the fields on your check. If not, make
further fine adjustments until the alignment is satisfactory.
You can also measure
your check with a ruler:
-
Take measurements
of the fields on your check (in inches and fractions from the
top edge and left edge on the grid).
-
Click on each
output on the screen, select the desired measurements on the
right until you cover all five of the fields.
For example, suppose
you've selected Regular Wallet checks, which is 6 inches in Width
and 2 and 3/4 inches in Height. Click on the Date output 5/8/2003.
The measurements in Selected Output tell you this item is positioned
1 inch from the top edge of the check, 3-7/8 inches from the left
edge, and extends 1 inch long (or 1 inch in width). Now if the
underlined field after Date on your check measures 1-1/2 inches from
the top, you'd click on the second little box under From Top Edge to
select the fraction of 1/2 from the list. And you will proceed with
the rest in the same way.
Remember, you have
to do this only the first time you use Monechron.
After you've set up
your check, you're ready to print.
-
Insert your blank
check in the printer. Insert a regular wallet check as you would
an envelope. If your printer has trouble printing on
regular wallet checks, click on EZPrint to print out a copy. The
simple device will help solve the problem. (See also FAQ)
-
Make sure all the
information you've entered is correct, and click on Print.
Well, you now have your
first check in hand using Monechron. After
the first time, printing checks on your Monechron should
be quick and easy like a breeze.
If you'd like to cancel
the check you've just written and printed, click on the Accounts
icon and you are in the transaction register

-
Select the check
you want to cancel from the list on the right.
-
Click on Void.
-
If you change your
mind again, click Undo in the top right corner to
restore the check.
If you're using Web
Scout™, all your transactions through your bank---ATM
withdrawals, transfers and deposits---will be automatically recorded
and displayed in your transaction register. If you're using only an
offline account, or if your bank's website is temporarily down, you
can record transactions as you would write a check. Let's
suppose you've just deposited a check of $500 in your checking
account and would like to record it in Monechron
now. What do you do? You click on the Pay and Record
icon and
-
After Type, select
Deposit.
-
After From, enter
where your check was from.
-
After To, select
Checking.
-
Fill in the Amount,
$500.00.
-
After Memo, enter
Travel reimbursement (just pretending that's what the check was
for).
-
Click on Record and
the transaction is saved in the register. (Note the new
balance!)
If you have any
questions, email us: support@qfxsoftware.com,
or go to the User Manual for a more
detailed description of Pay &
Record and Register
features.
 Previous Top
  Next
Next  |
